Sponsors


StatusCast Review – Maintaining Transparency with your End-Users
For SaaS providers, system interruptions are not just a technical problem, but also a huge communicational challenge to the marketing team; one that can easily end up hurting the bottom line.
And let’s face it, when there’s a bug in your system, you don’t can’t be worrying about how you’ll explain that bug to your users, you simply don’t have time for that. You’ve got to focus on what matters – fixing the root of the problem.
Now while there are a million tools out there that monitor your app, translating that message into something that’s communicable to the laymen/user is the real challenge. Users need to be notified in a friendly and straightforward manner as to the scope of the issue, because nobody likes being kept in the dark.
Especially people who are paying you to maintain their critical and sensitive information.
Enter StatusCast. This solution allows you to streamline bug reporting, incidents, and maintenance issues via email, RSS feeds and social media in order to have transparency and a constant flow of communication with your users.
Working in conjunction with popular monitoring systems, StatusCast is a highly customizable tool that is valuable for both the customer and staff. Plus, you don’t need to be tech savvy to use it – it’s a tool for your average marketing nut.
We took time to dig around this application to give you the low-down. Enjoy!
StatusCast’s Two Perspectives
StatusCast is useful from the perspective of both app owners and app users.
View 1: The Admin View. The admin view is for internal use, and includes things like the Dashboard, Settings, the creation of Incidents, etc. We will focus mainly on the aspects of the Admin view and how to navigate and make the most of the application
View 2: The “Status” page. This is a customer-facing page, with a unique URL, which is fully customizable and exists as reference page for users of your app.
The Admin Page User Experience & User Interface
The Dashboard
The dashboard is pretty intuitive to use…all of the options are situated in a side bar down the left-hand-side, and all of the information you would want to know at a glance displayed in the center (statistics, scheduled maintenance, incidents, and subscription).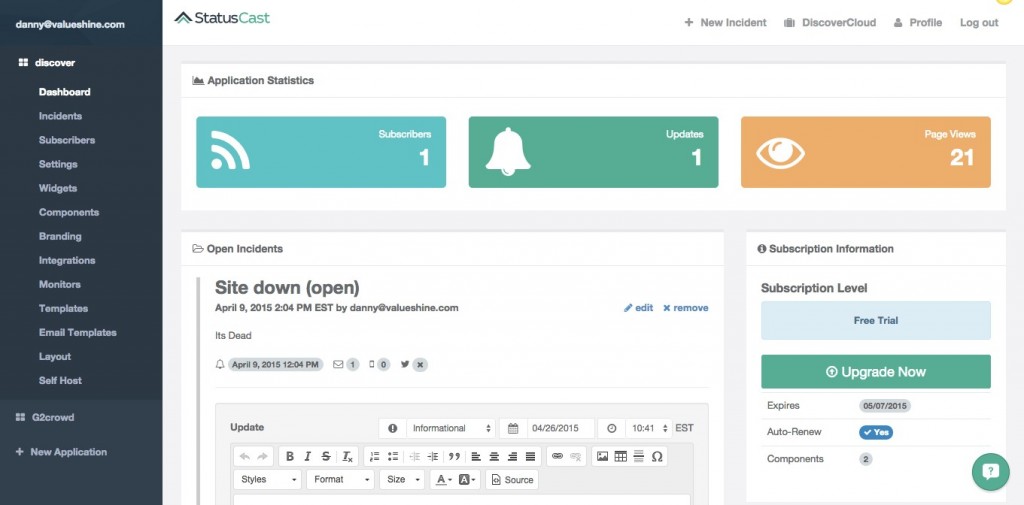 No technical expertise is required – navigation is straightforward and there are no hidden or difficult to find options.
The Application Navigator
With StatusCast you are not limited to connecting the system with just one application. Simply click the “New Application” tab located in the sidebar to add more, customize each one, while keeping track of them all from the same interface.

This is great for those who are working simultaneously with more than one application but wish to keep all tracking and correspondence in one place.
Settings Tab
Let’s take a look at the “Settings” tab. Broken down into categories so as to not be too confusing, I didn’t feel overwhelmed by endless options and choices.
Under the “Main” heading you can change your application name, URL, domain, time zone and options like time display format and privacy. If you wish your status page can be set to private, enabling only subscribed users to view it.
Brandability Through Text Customizations
The “Default Text” feature let’s you define the words and sentences that are used throughout your application’s status page and within the emails that are sent out to users.
Because, let’s face it, not every company wants to define a “fault in performance” as just that…they may want to choose other words or phrases which better reflect the situation and the brand.
For example, “performance issues” could now become “a partial service interruption,” as seen below:

The Email Tab
StatusCast again lets you keep your continuity by implementing SMTP integrations. This makes it appear as if all mail that’s sent out is coming directly from your company’s email. The customer immediately recognises your messages, and their mailbox’s spam protectors don’t automatically move it to the dreaded spambox.
This is a very important element as it lets you keep your unique branding features across all outlets – I’ll discuss this aspect in more detail in the sections below.
The “New Incident” Feature
The most used part of StausCast, the creation of an “Incident,” is a quick and straightforward way to send out tailored messages to customers. No matter what page you’re on, the “New Incident” button is always available and easy to find.
Once creating an incident you fill in the page from the top to the bottom, which has a natural workflow logic to it. There aren’t too many sections to complete and so it is relatively simple. Fill in when the incident will happen/has happened, the type of incident, affected components and your message. View this below:

StatusCast ensures that all the bases you would want to be covered are covered.
The backfilling/future options allows you (and your users) to track a holistic view of your app’s downtime/maintenance time – super useful for enabling you to always have statistics on hand to use where necessary. For example, you may want to include the app’s downtime for the past month in your newsletter, or put together a statistics report for staff use.
For scheduling maintenance in advance you have the option to automatically send reminders and re-reminders whenever you want. For a live incident, the message will automatically be sent out immediately. Timing really is everything!
As the process is automated you don’t have to try and remember yourself to send reminders again and again.
Include as much or as little information in your message as you want, there are no boundaries. Use the handy “Subject” bar to fill in the jist of the message, and if Twitter is enabled this will be posted as a Tweet to all your followers.
All the customizations available for conveying incidents to end-users make it possible to translate something which may be complicated in the back-end into something that’s totally understandable.
At this stage you have the option to choose whether an incident represents “Downtime” or not. Downtime refers to the period of time when a system is unavailable. This indicates whether it will factor in to the “Uptime” percentage on your app’s status page. Conversely, uptime is the time when the system is available.
You might decide that you don’t always want certain periods of downtime to be factored in. For example, if you know that interruptance is only going to be for a few seconds of minutes, you might not deem this as significant enough to be included in the statistics.
When an incident is classed as “Open” you can still post updates to it, which is a very handy option. No need to create a whole new incident as everything is changeable and updateable. Have the option to either “Save” changes or “Save and Update” Changes.
Some More Awesome Branding Options in the “New Incidents” Feature
I’ve mentioned this earlier, but one of the best aspects of StatusCast is the freedom it permits in regard to personal branding. The system doesn’t try to hijack all your posts and emails with their own style…they leave it up to you.
A really great feature is the ability to tailor a custom messages using a basic HTML editor for each incident. A functional and very convenient way to customize the message to look and sound just how you want it to.
Under “Styles” custom CSS is available and so if you are a CSS whizz you can really knock yourself out. With 100% style pages you are not limited in any way.
The Layout Tab
Now let’s head over to Layout for even more advanced customization options. Here you can style up your Status page with a range of drag & drop widgets located on the right of the screen.
I find this interface very constructive and informative as it is laid out just as you will see it on the real Status page. No need to guess or keep switching pages to check. The Drag & Drop feature makes it easy to rearrange/order elements, and essentially acts as a WYSIWYG editor.

Change the theme of your page in order to be more coherent with your brand. Make changes to templates by altering the CSS (again all the freedom is yours if you know what you are doing). It is possible to add some third-party scripts, but some will get automatically ripped out by the system, especially those employing JavaScript (such as most live chat service APIs).
The Components Feature
This is where all the real organization happens. Sort the users of your application into different groups according to location, server, or any parameter you decide. Nobody wants to spam their users with endless messages and updates that aren’t relevant to them. This organization of components allows you to direct the correct messages to the right people at the right time.
Management of components is easy due to the Drag and Drop feature. Simply add, move, edit, delete or hide components form the list.
“Hiding” a component makes it disappear from the list and also from the status page, and “retiring” enables you to temporarily put a component to the side and have it no longer factor in your app’s uptime/downtime statistics. Pull these components back into business when you need them again.

Creating Some Nifty Email Templates
Save yourself some time by making email templates that can be easily customized and sent out to the necessary constituents. For example, you can have one for when your west coast servers go down so you can send it out at a moment’s notice (if such a need arises).
Brand emails with your application’s recognizable features, customize the text to say exactly what you want and change the CSS if you’ve got the know-how. There is no need to let personal branding fall by the wayside just because you are sending a run-of-the-mill technical message.
This whole personalization process is made simple by StatusCast’s industry standard HTML text editor:

All of the text editing options along the top, and below – a list of all the valid macros.
Creating templates allows you to partially automate the process; reducing time, effort, stress and money spent fruitlessly trying to fix the same problems over and over. That focus can now be transferred to other, more pressing issues.
Integrations
StatusCast integrates with quite a few other applications. One of the most functional is probably that it can harmonize with Google Calendar. This enables you to post events or incidents straight to someone’s Google Calendar and lets StatusCast inject stuff into your application’s Google Calendar for all to see on the status page.
There are many other cool integrations such as Google Analytics to measure traffic on your application status page, and an option to push a notification to all your users via Twitter.

Monitors
The main point of the monitors is to actually allow StatusCast to automate the process of notification of the incidents. When Pingdom (or whatever monitor you choose) sends out an alert, StatusCast can have a Webhook with Pingdom that integrates with Pingdom’s alert and automatically sends a tailored message to users. This message can be completely customized to your own satisfaction.
A semi-automated process, these messages aren’t sent out automatically. This process is helpful as it mitigates risk factors of sending out wrong information to the wrong people.
You don’t have to publish each and every scheduled message. If you don’t, it will be published as a draft, enabling you to edit and post it at a later date if necessary. What makes StatusCast different to an IT monitoring tool is that it lets the SAAS solution providers determine which issues need to be conveyed to application end-users and which don’t.
Not every blip in the system requires a widespread notification. As mentioned earlier, maybe you don’t necessarily want users to know that you were down for five seconds, as that is a pretty insignificant period of time. Tailor the “wait time” to suit you…the number of minutes to wait for an uptime alert before creating a new incident.

For the monitors, you can set up as many as you wish, monitoring different incident types or different components affected. This take a lot of pressure out of having to do things manually, giving you and your team more time to spend on more important issues.
Implementing a StatusCast Widget
This option lets you create an iFrame to be implemented on your website for all the widgets you see on the Status page. For example, a calendar of scheduled maintenance, an uptime indicator, or a log of recent posts on your company’s homepage. Here again the CSS is customizable, giving you endless possibilities.

The Subscriber’s Perspective – ‘Status Page’
As I mentioned in the beginning, StatusCast has two perspectives to look through. The subscribers view is of the static status page which essentially works as a hub of real time information to keep the end-users updated on uptime/downtime history and scheduled maintenance.

The URL for this page is customizable, so you can change it to what you want (you will, of course, have to make a few tweaks with your DNS provider).
All of the current information is shown here in a clearly presented board style format with icons to represent the app’s status. Uptime and current status are the most obvious elements (but this can be customized to look how you want). It’s basically a complete summary of your app’s status: historical, present and future (if you wish).
The grid lets you lay out in a clear way the organization of your company. How is your company split up? Are there different applications and servers that you are offering? Within each group you can even split them into sub-groups (i.e US servers, West Coast servers…etc) so users can view specific information which is relevant to them. Here again there is the possibility to view back in time or into the future as required.
Users can subscribe to the status page so they receive regular updates via notifications and not have to actively check statistics themselves. Easily located on the upper-right hand corner is the subscribe option. Here anyone can choose to receive messages via email, SMS, Twitter or RSS.
Alternatively, users can access it as a ‘standalone feature’ from a link on your website, from within an email, a newsletter, etc.
Final Thoughts
If it is important for your app to communicate information about uptime/downtime/maintenance to end-users, then StatusCast is an ideal tool.
StatusCast provides applications with a way to be transparent with customers by sending them automated notifications to keep them in the loop at all times. By working seamlessly in conjunction with other monitoring systems you can send out accurate updates and at the same time free up your IT staff.
As almost everything on StatusCast is personally customizable, keeping the look of your brand name is easy and encouraged, and with such an accessible interface you really don’t need to be a tech geek to work it out. If you have any trouble the green help icon is always located in the bottom-right corner to give you a helpful and in-depth answers to your questions.
Give it a go and see if you can earn the complete trust of your customers by feeding them more information and keeping them informed.
And don’t forget to share your experiences in the comments!
Recent Stories


Web Development leading tools


Top DiscoverCloud Experts


Featured Products
Compare Products
Select up to three two products to compare by clicking on the compare icon () of each product.
{{compareToolModel.Error}}
{{CommentsModel.TotalCount}} Comments
Your Comment